The Appointment Booking module is a core component of clinic operations in KiviCare EHR. It enables clinics to schedule, track, and manage patient visits efficiently while supporting role-based access for Administrators, Clinic Admins, Doctors, Receptionists, and Patients.
This module ensures smooth appointment workflows and accurate visit tracking across the system.
1. Accessing Appointments
To view the appointment schedule:
Navigate to Appointments from the main menu
This opens the complete list of all scheduled appointments
2. Appointment List Interface
The All Appointments page provides a centralized view of all scheduling activities within the clinic.
[Screenshot Placeholder 1: Appointment List View] Description: Screenshot of the Appointment List page highlighting the Filters button, Add Appointment button, and the main data table with status badges such as Booked and Check In.
Key Features
Filter Panel
Click the Filters button to open the side panel and refine appointment results by:
Date Range: View appointments for specific days or weeks
Doctor / Clinic: Filter appointments by doctor or clinic
Status: View Pending, Booked, or Cancelled appointments
Patient: Search appointments for a specific patient
Search Bar
Quickly locate appointments by entering a patient’s name
Export Options
Export appointment data in CSV, Excel, or PDF format for offline review and reporting
Appointment Statuses
Each appointment displays a status for quick identification:
Booked: Confirmed upcoming visit
Check In: Patient has arrived at the clinic
Check Out: Visit completed, and patient has left
Cancelled: Appointment removed from the schedule
Pending: Appointment awaiting confirmation
Appointments can be booked manually by Administrators, Doctors, Receptionists, and Patients. Patients can also initiate bookings directly from their dashboard.
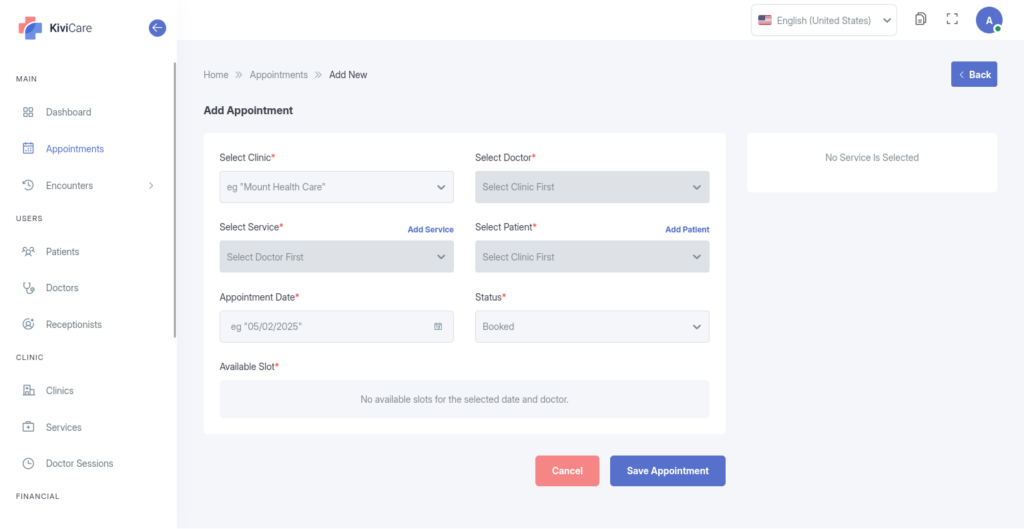
Steps to Book an Appointment
1
Start Booking
Click the Add Appointment button in the top-right corner
2
Enter Basic Information
– Clinic: Select the clinic (if applicable) – Doctor: Choose the assigned doctor – Patient: Select the patient
3
Select Service and Time
– Service: Choose the medical service (charges are auto-fetched) – Date: Select the appointment date – Slot: Pick an available time slot from the doctor’s schedule
4
Add Additional Details
Click Save to confirm the appointment
Description: Add notes or special instructions for the visit
Status: Defaults to Booked (can be set to Pending if approval is required)
4. Managing Appointments
Once booked, appointments can be managed directly from the appointment list.
Check-In and Check-Out
Check-Out: After the consultation, click the Check-Out icon to complete the visit.
Check-In: On the appointment day, click the Check-In icon to mark the patient as arrived. This activates the Encounter Dashboard link.
Editing & Cancelling
Edit: Click the Pencil icon to change the date, time, or service details.
Cancel: Click the Delete/Cancel icon to remove the appointment from the active schedule.
Video Conferencing
For telemedicine appointments:
A Video Conference icon appears once the appointment is Checked In
Doctors can launch the video call directly from the appointment interface
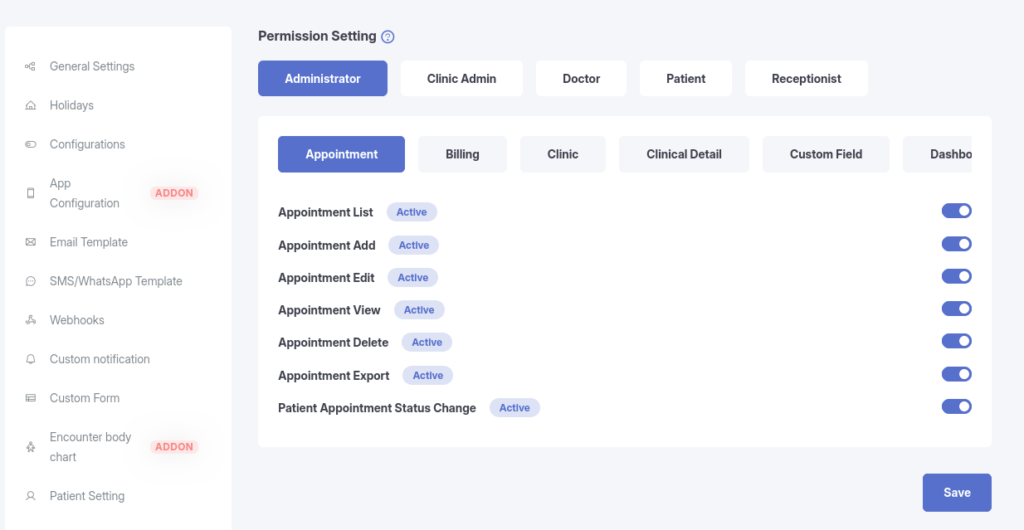
5. Permissions
Access to appointment scheduling features is role-based and can be configured from:
Settings → Permission Settings
Role-Based Access
Clinic Admins & Doctors:
Full access to book, edit, and cancel appointments within their clinic
Receptionists:
Full access to manage front-desk operations, including booking, check-in, and cancellations
Patients:
Book: Can schedule their own appointments via the patient dashboard
Cancel: Can cancel their own appointments (subject to a cancellation buffer set by the admin)
View: Can view only their own appointment history
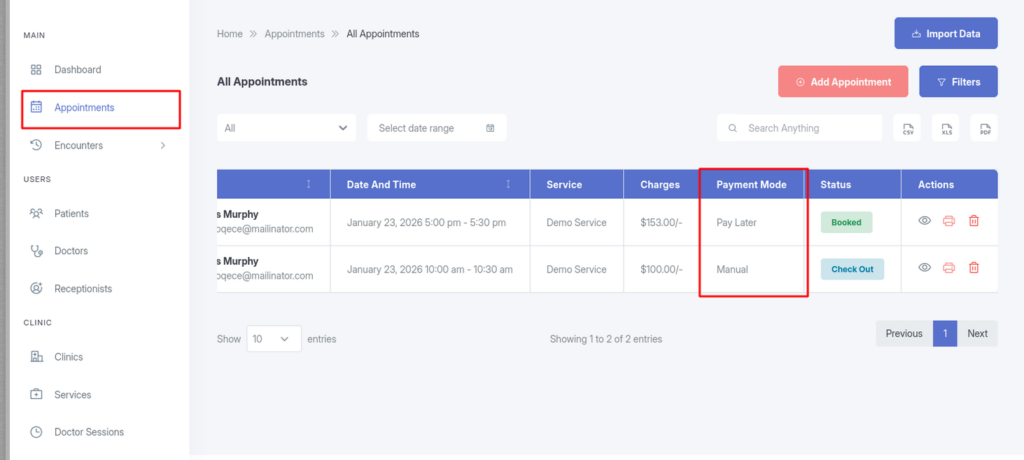
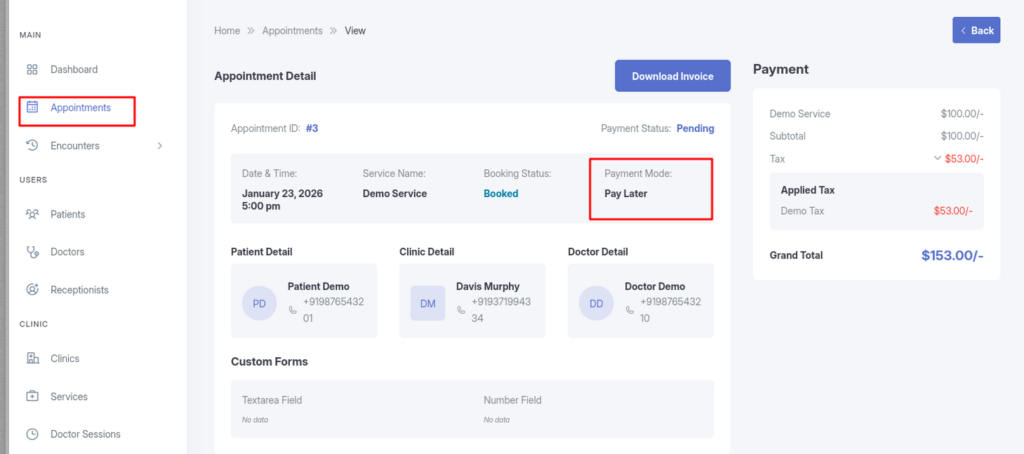
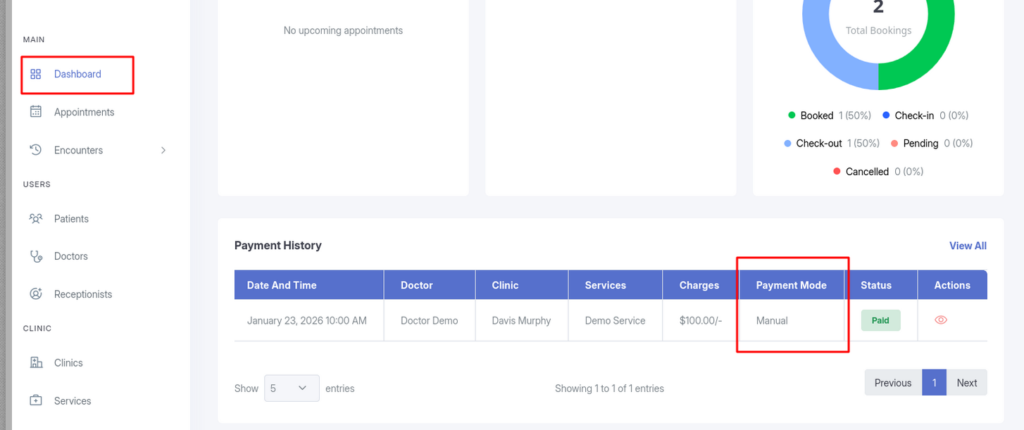
6.Viewing Payment Information
The payment method (Payment Mode) for an appointment is visible in several locations within the system:
In the Appointment List
The Payment Mode column displays the payment type (e.g., Manual, Pay Later, etc.) for each appointment.
In Appointment Details
Open any appointment to view the Appointment Detail panel. The Payment Mode is listed under the appointment header.
In Payment History
Navigate to Dashboard → Payment History from the main menu to see a dedicated log of all transactions, including Payment Mode, status, and charges.