This comprehensive guide covers everything you need to know about Patient Portal Access in KiviCare Lite. Whether you’re a beginner or an advanced user, this documentation will help you understand and implement this feature effectively.
Overview
Patient Portal Access is an essential component of the KiviCare EHR system, designed to streamline healthcare management processes. This feature integrates seamlessly with other modules to provide a comprehensive solution for medical practices.
Key Features
Easy to use and intuitive interface
Seamless integration with existing workflows
Comprehensive data management capabilities
Real-time updates and notifications
Customizable settings and configurations
Getting Started
As a patient, you have secure, role-based access to essential features. This means you can view and manage your personal health information without accessing sensitive administrative tools. Here’s what you can do:
Dashboard and Profile
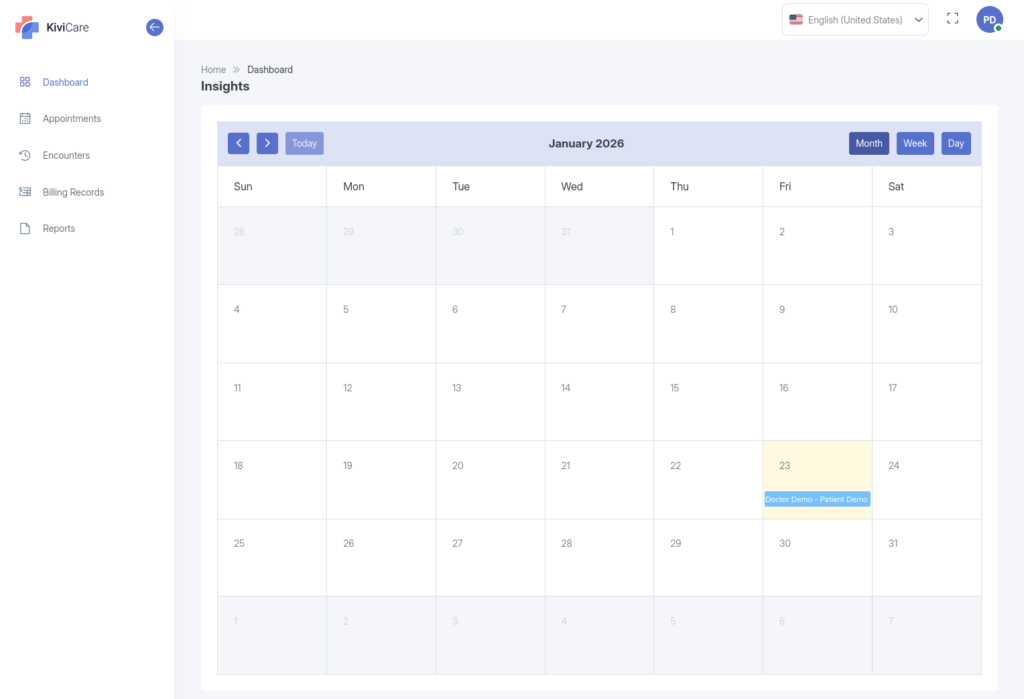
View your personalized dashboard for a quick overview of your appointment schedule in the calendar.
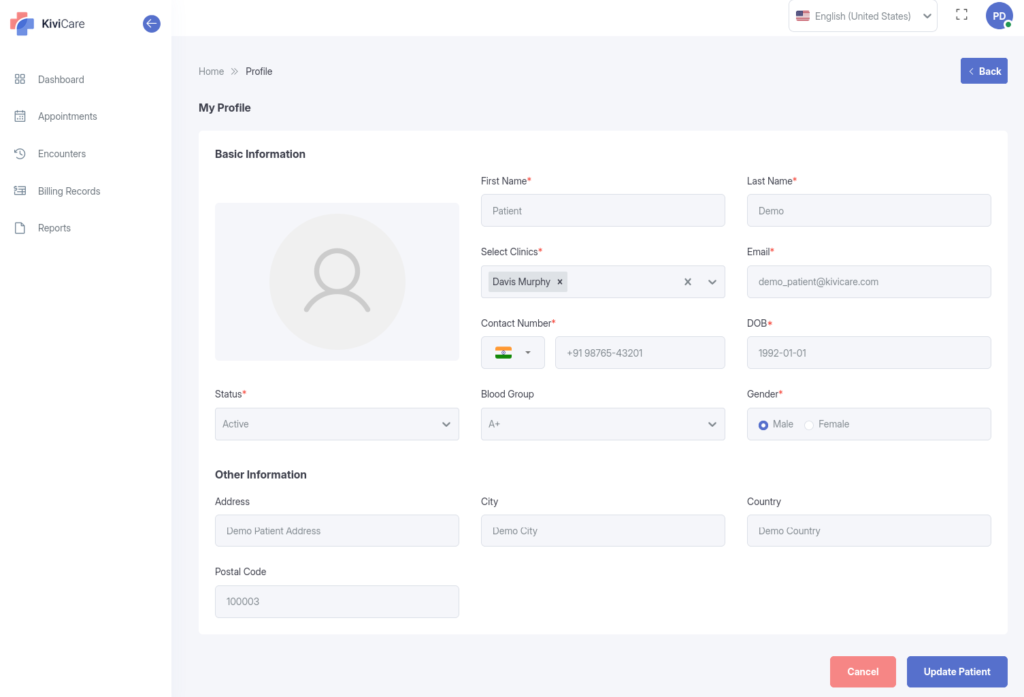
Access and update your profile details, including personal information and contact preferences.
Change your account password at any time for added security.
Appointments
Browse, create, edit, view, and cancel your appointments.
Export your appointment history for personal records.
Medical Records and Reports
View your medical history, reports, and records.
Add, edit, or delete your own reports (where applicable).
Encounters
Review your past interactions with healthcare providers.
Export encounter summaries.
Prescriptions and Billing
View and export your prescriptions and billing details.
Track payment status and outstanding balances.
Reviews
Submit, edit, or delete reviews for doctors.
Managing Your Profile
Your profile is the foundation of your KiviCare account. Keeping it current ensures accurate communication and care coordination.
What You Can View and Edit
Personal Details
First and last name
Email address
Mobile phone number
Date of birth
Gender (options: Male, Female, Other)
Medical Information
Blood group
Medical history summary
Ongoing medical conditions or problems
Address Information
Street address
City
Country
Postal or ZIP code
Additional Options
Upload or change your profile photo
View your unique patient ID (if assigned by your clinic)
Check your account status (e.g., Active)
Appointments
Appointments are easy to manage, helping you stay on top of your schedule.
Viewing Your Appointments
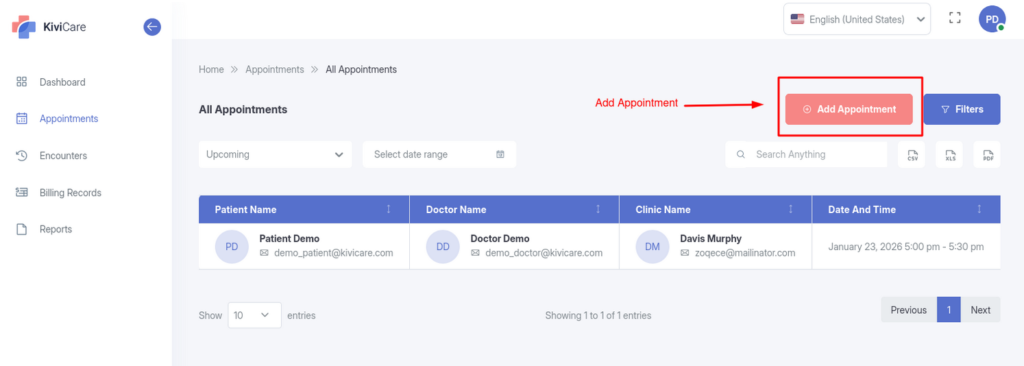
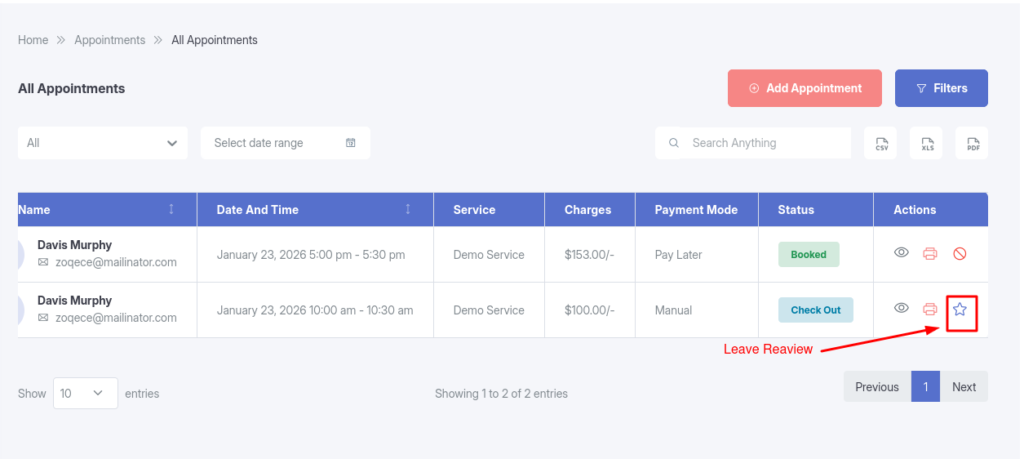
List View: All appointments appear in a simple table, sorted by date.
Filters and Search: Narrow results by date range, status (e.g., Upcoming), doctor, or clinic. Use the search box for keywords like a doctor’s name.
Export Options: Download your list as a CSV, Excel, or PDF file for printing or sharing.
Creating a New Appointment
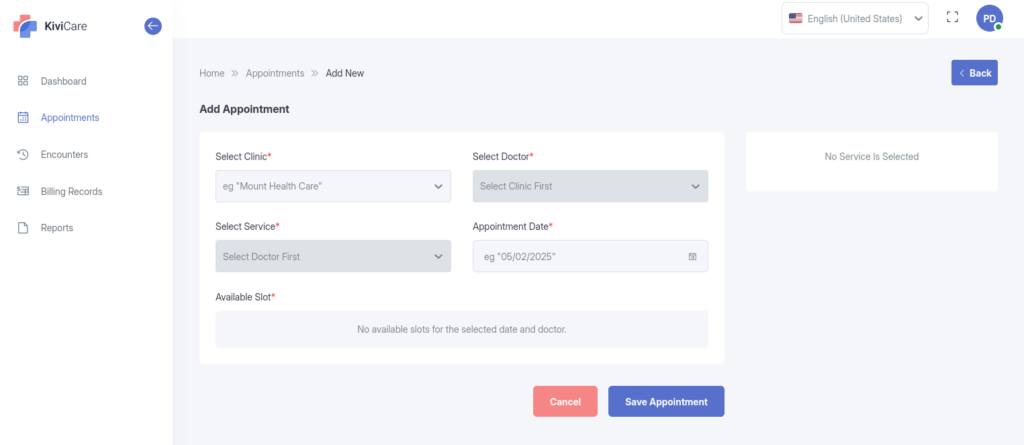
From the Appointments tab, click “Add Appointment.”
Select your preferred doctor and service type (e.g., consultation).
Choose a date and time from the available calendar slots.
Pick your clinic location if multiple options exist.
Add any notes or special requests.
Review and confirm—the system will notify you and your doctor.
Editing an Appointment
Open the appointment from your list.
Click “Edit” to adjust details like time, doctor, or notes.
Save changes; notifications will update all parties.
Canceling an Appointment
Select the appointment and choose “Cancel.”
Provide a brief reason (optional but helpful).
Confirm—the doctor and clinic will be notified automatically.
Tracking Appointment Status
Monitor progress with these common statuses:
Booked: Your appointment has been successfully reserved in the system.
Pending: The appointment is in review, often waiting for doctor or clinic approval before it’s fully set.
Check In: You’ve arrived at the clinic and checked in—staff will guide you from here.
Check Out: The visit is wrapping up; this status appears after your session ends, often with notes added.
Cancelled: The appointment is no longer active.
Accessing Medical Records and Reports(Available in Pro version)
Stay informed about your health with full visibility into your records.
Viewing Medical Records
Access your complete history, including past conditions and treatments.
Review medical problems and track changes over time.
Use filters to focus on specific dates or types.
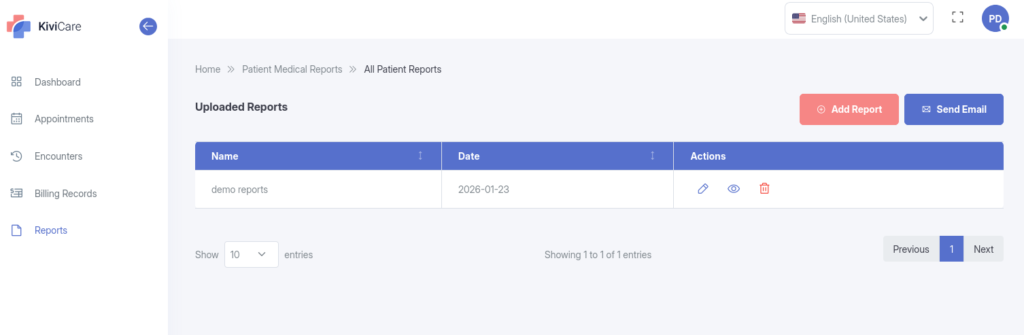
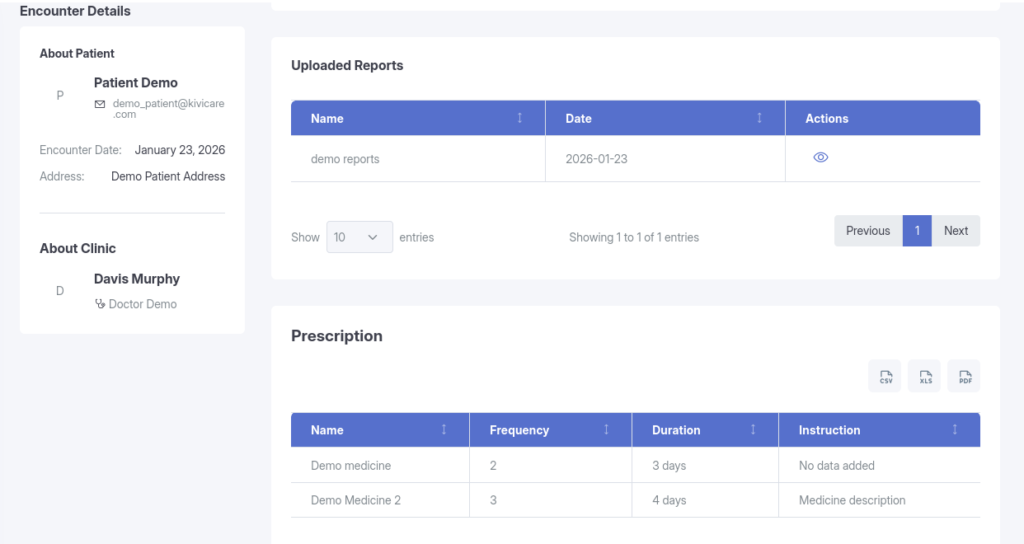
Managing Reports
View: Browse all your reports in one place.
Add: Upload new documents or create simple entries.
Edit or Delete: Update or remove your own reports as needed.
Export: Save reports in CSV, Excel, or PDF for your files.
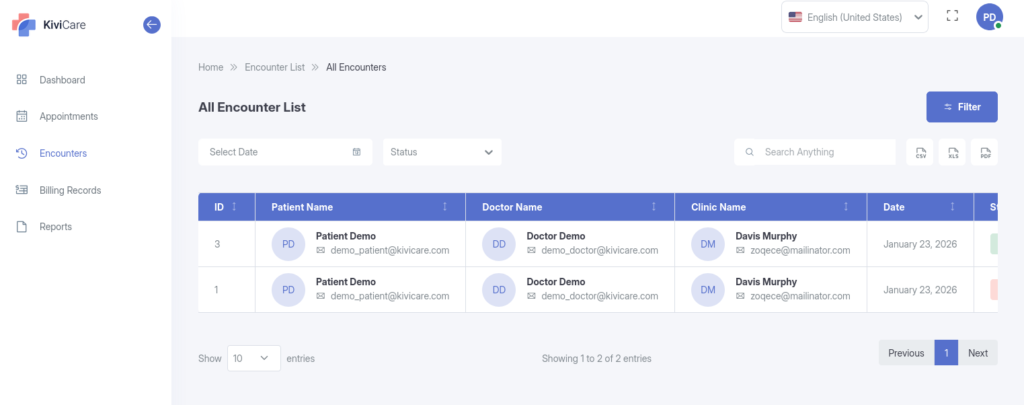
Reviewing Encounters
See a list of all your visits with doctors.
Read detailed notes from each encounter.
Export summaries for reference.
Reviewing Prescriptions
Keep track of your medications effortlessly.
Viewing Prescriptions
List View: All prescriptions are listed chronologically.
Details: For each one, see medication name, dosage, frequency, duration, and doctor’s instructions.
Export: Download as a printable file.
Billing and Invoices(Available in Pro version)
Understand your costs and payments clearly.
Viewing Bills
Bill List: See all invoices in a straightforward table.
Details: Break down charges, including totals, taxes, and discounts.
Payment Status: Track what’s paid, pending, or overdue.
Managing Bills
Review your full billing history.
Download invoices for records or insurance.
Export data for easy sharing.
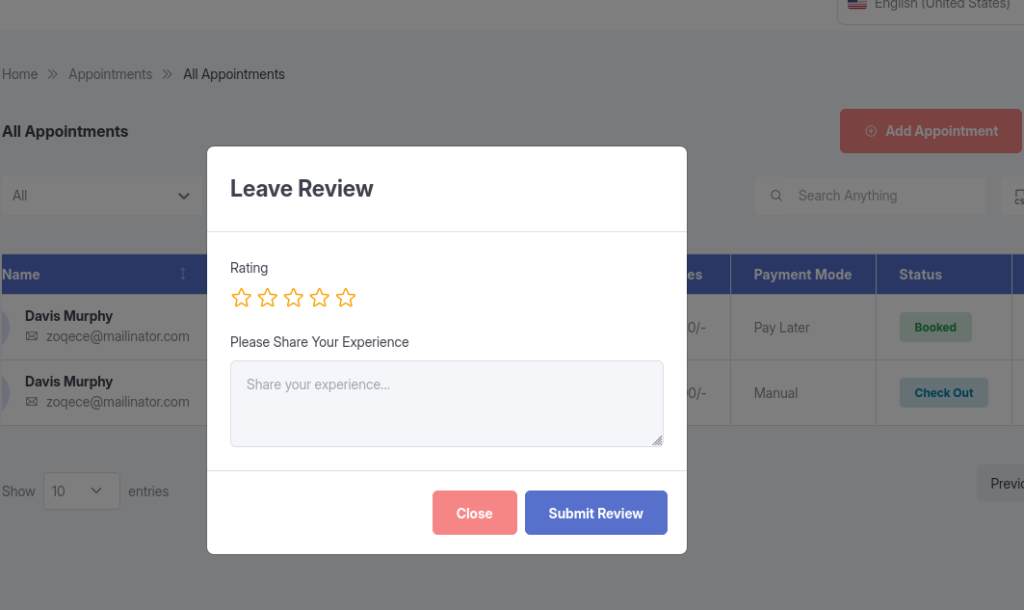
Leaving Reviews(Available in Pro version)
Discover what’s offered and share your feedback.
Reviews
Add a Review: Rate and comment on doctors or services after an appointment.
Edit or Delete: Update or remove your own feedback.
View: See your submitted reviews.
Receiving Notifications
Stay connected without missing important updates.
Types of Notifications
Email: For confirmations, reminders, prescription changes, bills, and password resets.
SMS (if enabled): Quick alerts for appointments and urgencies.
Exporting Your Data(Available in Pro version)
Take your information with you anytime.
Supported Formats
CSV (for spreadsheets)
Excel (XLS)
PDF (for printing)
What You Can Export
Appointments
Medical records
Prescriptions
Bills
Encounters
Best Practices
To get the most out of Patient Portal Access, consider implementing these best practices:
Regular Updates: Keep your system updated to access the latest features and security patches
Staff Training: Ensure all users are properly trained on the functionality
Data Backup: Regularly backup your data to prevent loss
Documentation: Maintain internal documentation of your specific configurations
Troubleshooting
If you encounter any issues with Patient Portal Access, try the following troubleshooting steps:
Clear your browser cache and cookies
Verify that you have the necessary permissions
Check for any plugin conflicts
Review the system logs for error messages
Contact support if the issue persists
Related Resources
For more information about Patient Portal Access and related features, check out these additional resources:
KiviCare Video Tutorials
Community Forum Discussions
Official Documentation Portal
Support Ticket System
Conclusion
Patient Portal Access is a powerful feature that enhances your KiviCare EHR experience. By following this guide and implementing the best practices outlined above, you’ll be able to leverage this functionality to its full potential. If you need further assistance, don’t hesitate to reach out to our support team.