Complete guide to all KiviCare Pro settings for customization, branding, integrations, and configuration
Overview
The Pro Settings is a centralized location to configure all major KiviCare Pro features, including branding, dashboard behavior, integrations, notifications, and system preferences.
Access Path: Settings → Pro Settings
Sections Covered
Theme Settings (Branding & Colors)
Dashboard Slugs (Custom URLs)
WordPress Login Logo
Custom Notifications
Twilio Account Settings
Google Account Settings
Encounters Settings
Copyright Text
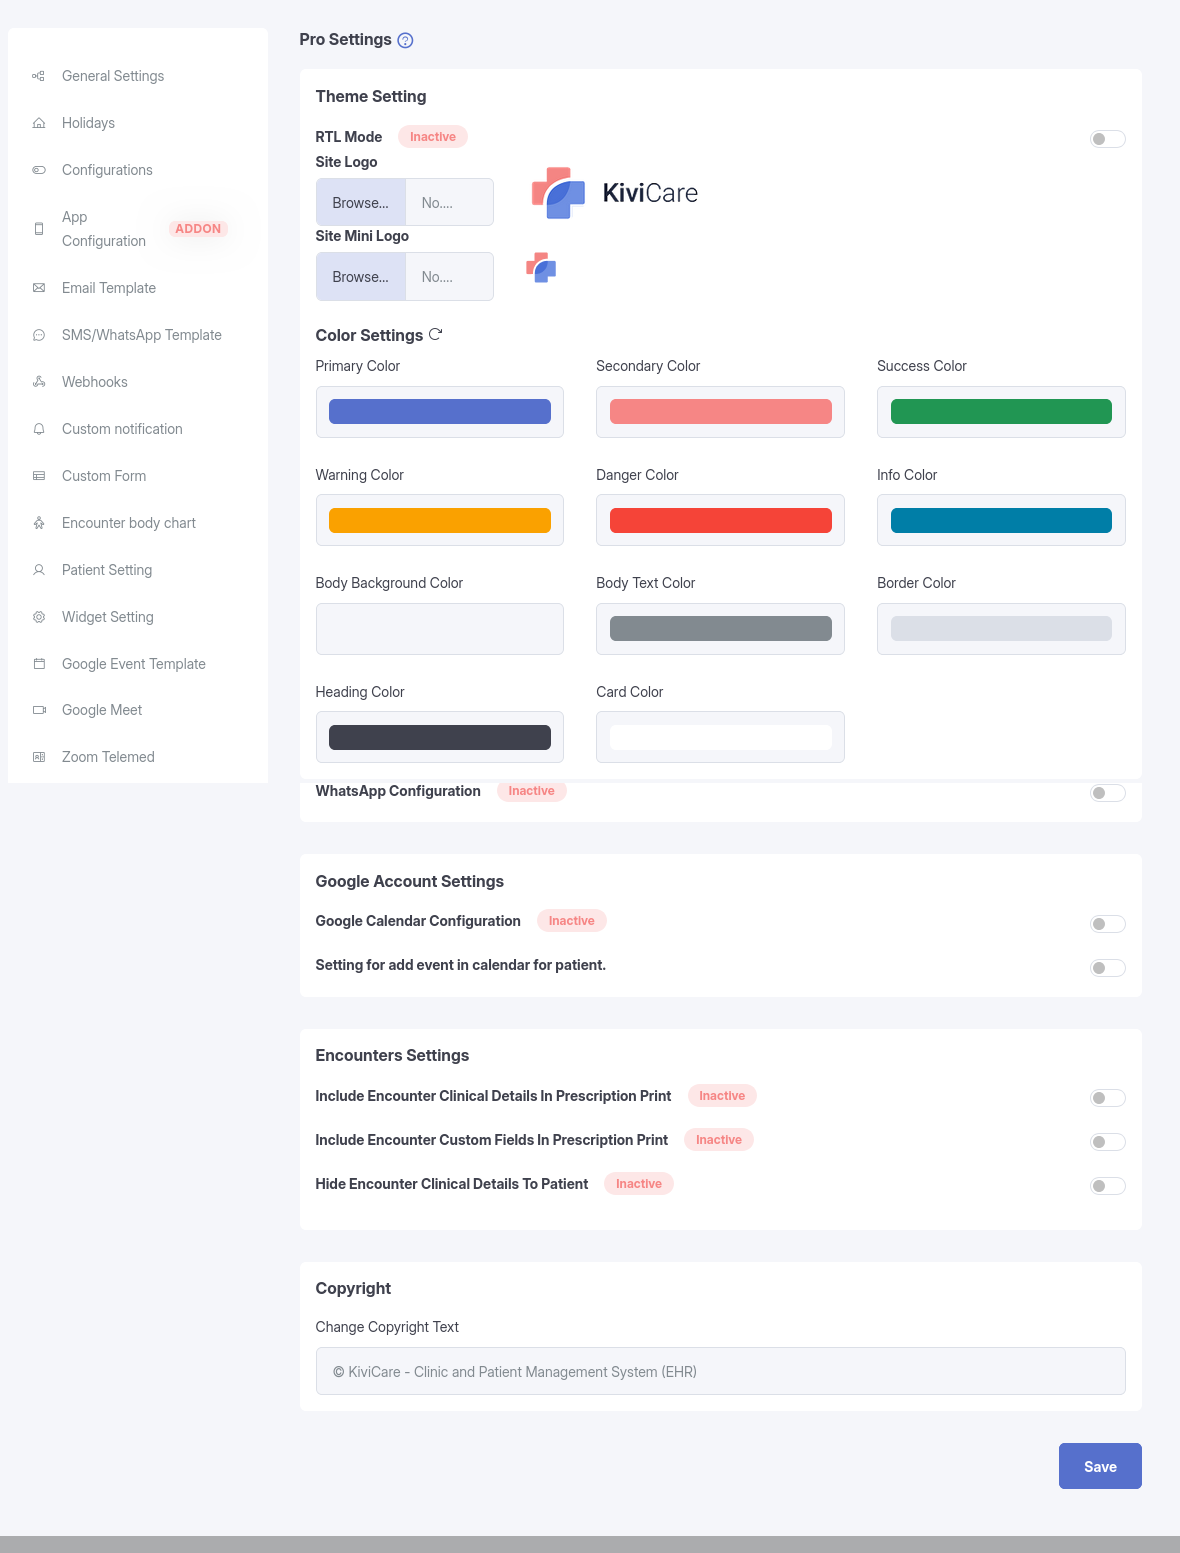
Theme Settings
RTL Mode (Right-to-Left)
Purpose: Enable support for RTL languages such as Arabic and Hebrew.
Configuration
RTL Mode: ON / OFF
Status: Active / Inactive
When Enabled
Dashboard layout switches to RTL
Text alignment adjusts automatically
Navigation menus are mirrored
Compatible with RTL-supported fonts
Recommended For
Arabic clinics
Hebrew language websites
Middle Eastern regions
Site Logo
Upload your clinic’s primary logo
Recommended Specifications
Format: PNG (transparent) or JPG
Size: ~200 × 60 px
Max file size: 2 MB
Aspect ratio: 3:1
Upload Steps
Click Upload Site Logo
Choose from Media Library or upload a new file
Select the image
Preview the logo
Click Save
Logo Appears In
Dashboard header
Invoices & bills
Patient portal
Email templates
Printable reports
Site Mini Logo
Compact logo for small spaces
Recommended Specifications
Format: PNG or SVG
Size: 40 × 40 px
Max file size: 500 KB
Used In
Collapsed sidebar
Mobile view
Small navigation areas
Site Loader
Custom loading animation
Recommended Specifications
Format: GIF or SVG
Size: 100 × 100 px
Max file size: 1 MB
Displayed When
Loading dashboard pages
Fetching data
Processing actions
Color Settings
Customize the entire dashboard appearance using 11 color options.
Primary Color
Used for buttons, links, and active states.
Default: #5670CC
Secondary Color
Used for accents and badges.
Default: #f68685
Success Color
Used for success messages.
Default: #219653
Warning Color
Used for warnings and pending status.
Default: #FAA100
Danger Color
Used for errors and cancelled status.
Default: #F54438
Info Color
Used for tooltips and info messages.
Default: #007EA7
Background & Text Colors
Body Background: #f5f6fa
Body Text: #828A90
Border Color: #dbdfe7
Heading Color: #3F414D
Card Color: #ffffff
Using the Color Picker
Steps
Click on a color field
Choose color using picker or enter HEX code
Preview updates instantly
Click Save
Reset Colors
Click the Reset icon
Confirms reset
Restores default colors
Dashboard Slugs
Customize dashboard URLs for each role.
Why Use Custom Slugs
Professional URLs
Easy to remember
Better branding
SEO-friendly
Available Slugs
Admin Dashboard
yoursite.com/kivicare-admin
Clinic Admin
yoursite.com/clinic-dashboard
Doctor Portal
yoursite.com/doctor-portal
Receptionist
yoursite.com/front-desk
Patient Portal
yoursite.com/my-health
Slug Rules
Allowed
Lowercase letters
Numbers
Hyphens (-)
Not Allowed
Spaces
Special characters
Uppercase letters
Underscores
Best Practices
Keep short and descriptive
Avoid generic names like admin
Include brand name if possible
WordPress Logo
Custom Login Page Logo
Enable Option
Enable WordPress Logo: ON / OFF
When Enabled
Replaces default WordPress logo
Appears on /wp-login.php
Improves branding consistency
Recommended Specs
Size: 80 × 80 px
Format: PNG or JPG
Max size: 1 MB
Custom Notifications
Enable SMS
Enable SMS: ON / OFF
Allows custom SMS notification rules.
Enable WhatsApp
Enable WhatsApp: ON / OFF
Allows WhatsApp campaigns and reminders.
⚠️ Note: Twilio configuration is required.
Twilio Account Settings
SMS Configuration
Required Fields
Account SID
Auth Token
Phone Number (+CountryCode)
Test SMS
Click Send Test SMS
Enter mobile number
Receive confirmation message
WhatsApp Configuration
Required Fields
Account SID
Auth Token
WhatsApp Number (whatsapp:+1234567890)
Additional Requirements
WhatsApp Business Account
Approved templates
Google Account Settings
Google Calendar Integration
Enable
Google Calendar Configuration: ON / OFF
Required Credentials
Client ID
Client Secret
App Name
Important
Copy redirect URL
Paste into Google Cloud Console
HTTPS required
Google Calendar Event Status Colors
You will see a list of appointment statuses
Assign a color to each status (e.g., Cancelled, Booked, Pending, Check-In, Check-Out)
Choose colors based on your preference
Result
Appointment events synced to Google Calendar will display with the selected colors
This helps easily identify appointment status directly in Google Calendar
Default Status Colors
Cancelled → Red
Booked → Blue
Pending → Yellow
Check-Out → Gray
Check-In → Pale Green
Available Color Options
Red
Blue
Yellow
Gray
Green
Pale Green
Pale Blue
Mauve
Pale Red
Orange
Cyan
Default Behavior
If no colors are selected, the system will use default colors
Default colors ensure proper functionality without configuration
Reset to Default
Click the Reset button
All colors will revert to system default settings
Note
This feature works only after Google Calendar is properly configured
Changes will apply to newly synced or updated appointments
Patient Calendar Events
Add appointment to patient calendar: ON / OFF
When enabled, patients can sync appointments with Google Calendar.
Encounters Settings
Include Clinical Details in Prescription
Toggle: ON / OFF
ON → Diagnosis & vitals included
OFF → Medications only
Include Custom Fields in Print
Toggle: ON / OFF
Includes custom encounter form data in prescription PDF.
Hide Clinical Details from Patients
Toggle: ON / OFF
ON → Doctor-only notes
OFF → Patients can view full encounter
Recommended: Keep OFF unless required.
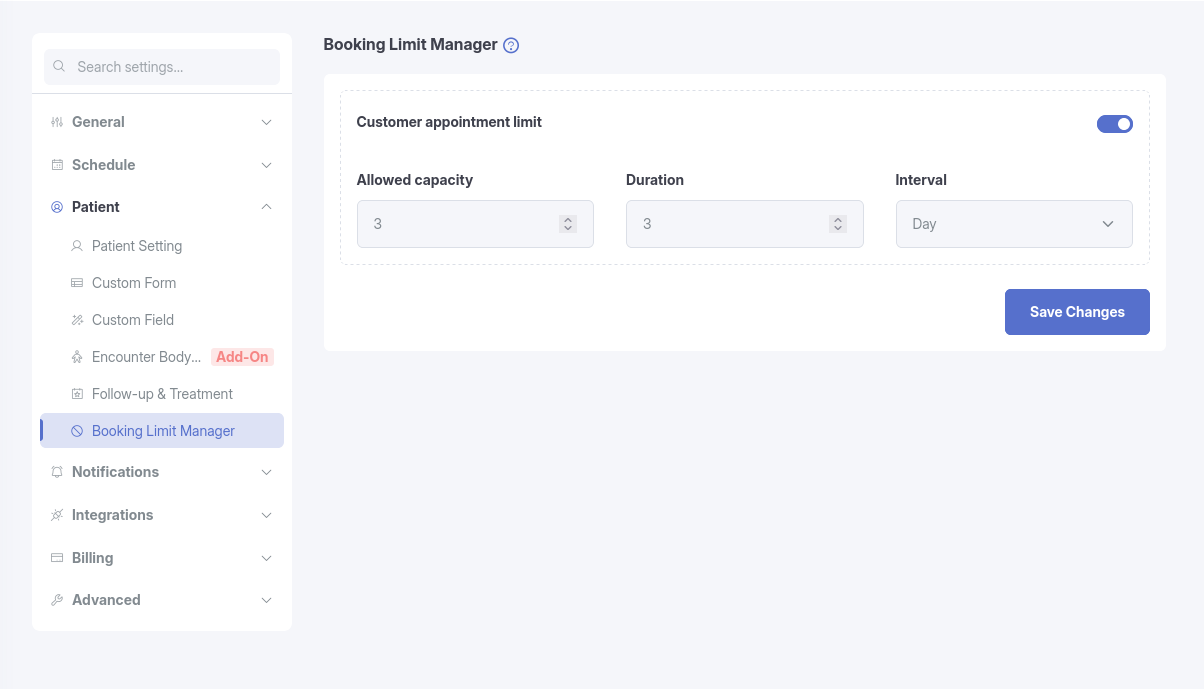
Booking Limit Manager
Customer appointment limit
The Booking Limit Manager allows administrators to restrict how many appointments a customer can book within a defined time period.
This prevents overbooking by a single customer and ensures fair availability of appointment slots across all users.
The Customer Appointment Limit feature enables you to apply global booking limits per customer, ensuring equal access to appointment slots and avoiding misuse of the booking system.
Settings
Customer Appointment Limit (Toggle)
Enables or disables the booking limit feature
If disabled → no booking restrictions are applied
Allowed Capacity
Defines the maximum number of appointments a customer can book within the defined time period