1. Overview
The Custom Form Settings feature in KiviCare allows administrators to create and manage dynamic forms for collecting additional information across different system modules.
Custom forms help clinics extend default data collection without modifying core system functionality. These forms can be attached to various workflows and records to capture clinic-specific information.
Supported Modules
Custom forms can be created for the following modules:
- Appointments – Collect extra booking details
- Encounters – Capture clinical or visit-specific data
- Patients – Store additional patient information
- Doctors – Maintain extended doctor profiles
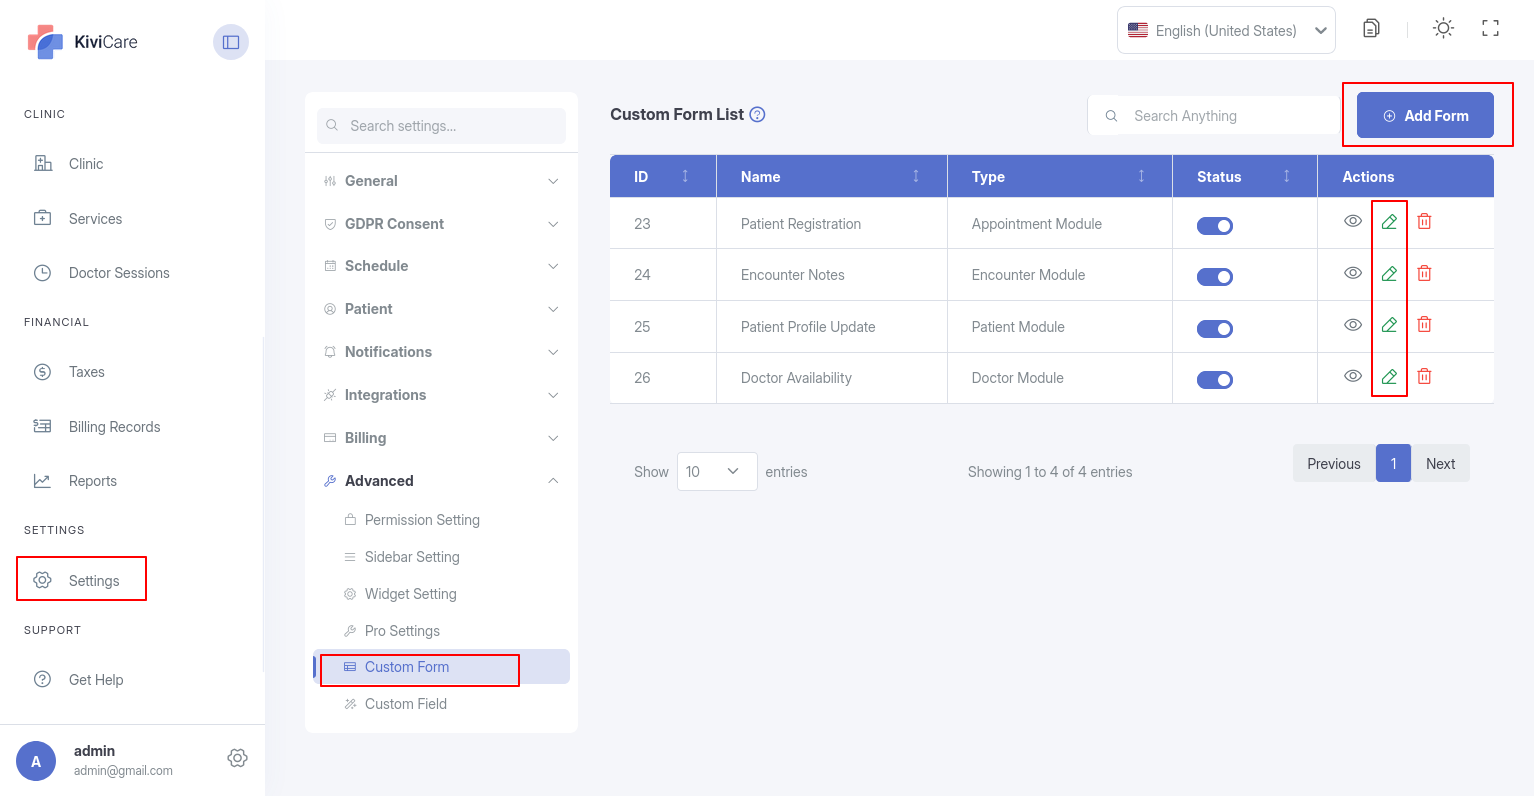
2. Custom Form List
The Custom Form List page displays all created forms and allows administrators to manage them efficiently.
Search
- Use the Search field to quickly find forms by name or module type.
List Columns
- ID
Unique identifier for the custom form.
- Name
Name assigned to the form.
- Type
Module associated with the form (Appointment, Encounter, Patient, Doctor).
- Status
Indicates whether the form is Active or Inactive.
Actions
- Toggle Status (Active / Inactive)
Enable or disable the form without deleting it.
- View (Preview Form)
View how the form will appear to users.
- Edit Form
Modify form settings and fields.
- Delete Form
Permanently remove the form and its configuration.
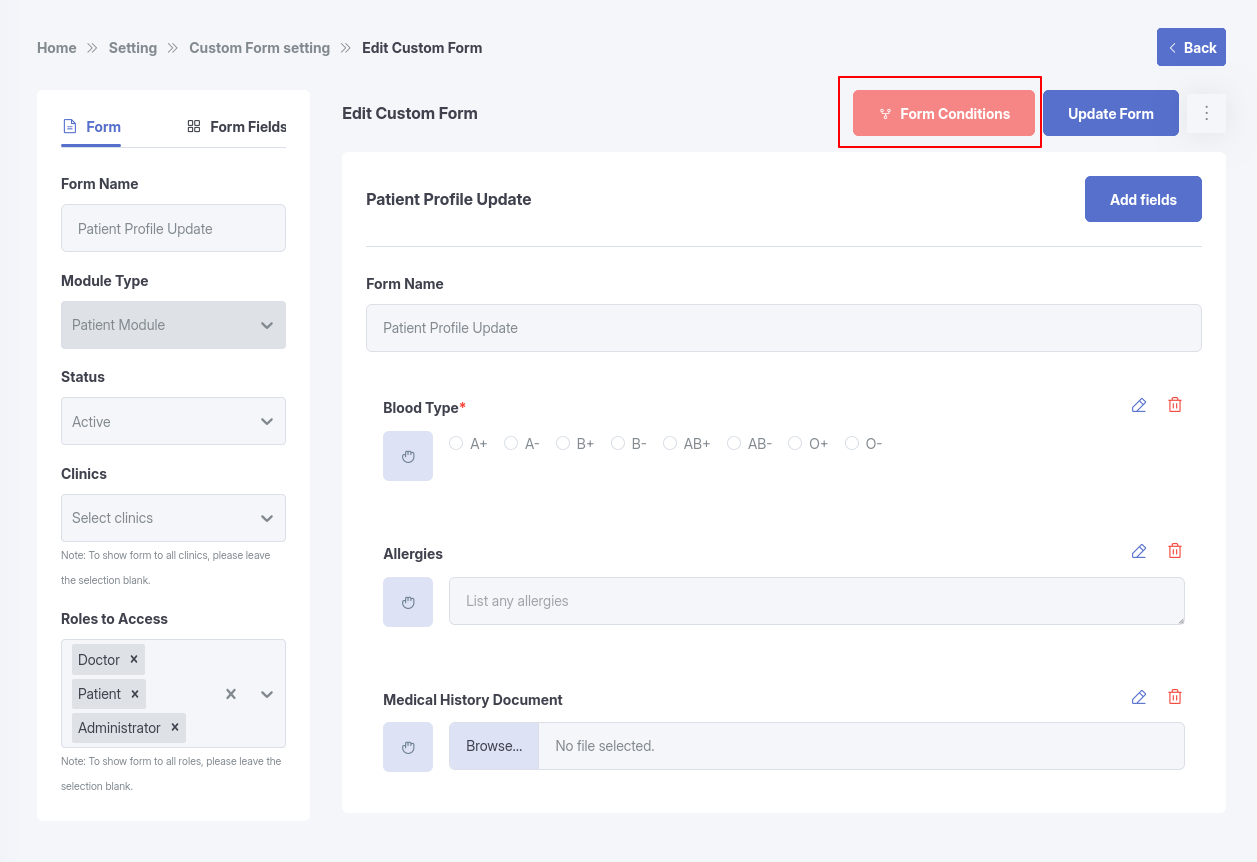
3. Creating & Editing Forms (Form Builder)
When creating or editing a form, KiviCare provides a drag-and-drop form builder to define structure, fields, and visibility rules.
3.1 Form Settings
Basic Settings
- Form Name
Internal name used to identify the form.
- Module Type
Select where the form will be used:
- Appointment
- Encounter
- Patient
- Doctor
- Status
Set the form as Active or Inactive.
Visibility Rules
Control when and where the form appears.
- Module Visibility
- Show form in Appointment or Encounter sections
- Clinic Restrictions
- Restrict visibility to Admin users only (if enabled)
- Role-Based Access
- Define which user roles can view or fill out the form
(e.g., Administrator, Doctor, Receptionist)
3.2 Form Fields
Available Field Types
You can add the following field types to your form:
- Text
- Text Area
- Number
- Email
- Dropdown
- Radio Buttons
- Checkbox
- File Upload
- Date
Adding Fields
- Use the drag-and-drop interface to add fields to the form layout.
- Reorder fields easily by dragging them into position.
Field Configuration Options
Each field includes configurable options:
- Label
Display name for the field (supports HTML formatting).
- Placeholder
Helper text shown inside the input field.
- Required Field
Toggle to make the field mandatory.
- CSS Class
Add custom CSS classes for styling or layout control.
- Column Width
Responsive layout options (e.g., 12, 6, 4 columns).
- Options (Dropdown / Radio Buttons)
Define selectable options manually.
4. Form Conditions
The Form Conditions feature allows you to dynamically control the behaviour of form fields based on user input. You can show or hide fields, enable or disable them, and make them required or optional depending on specific conditions. This helps create a more intelligent and user-friendly form by displaying only relevant fields and reducing unnecessary input.
The Form Conditions section enables you to define rules that control how form fields behave dynamically.
Accessing Form Conditions
To configure Form Conditions:
- Navigate to:
Settings → Advanced → Custom Forms Create a new form or edit an existing form.
- Inside the form builder, click on the “Form Conditions” button.
- The Form Conditions panel will open.
Refer to the screenshot below.
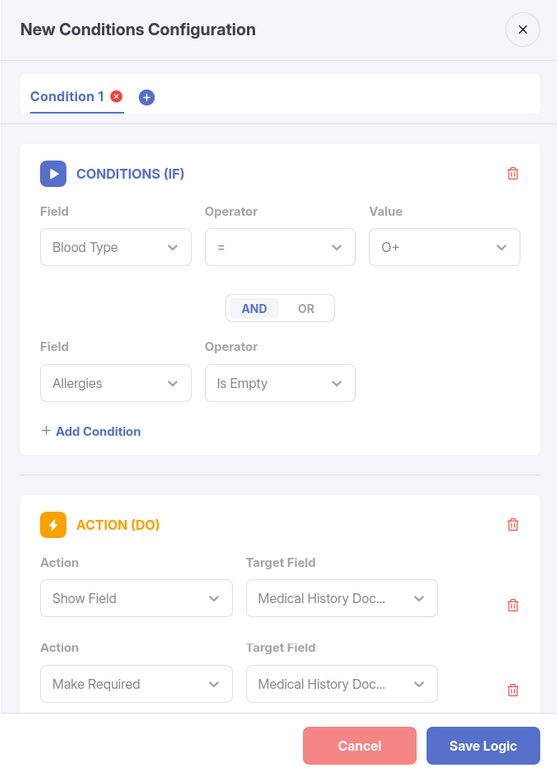
Understanding IF (Conditions) and DO (Actions)
Each condition is divided into two parts:
CONDITIONS (IF)
Defines when the rule should be triggered.
- Select a Field
- Choose an Operator
- Set a Value
ACTION (DO)
Defines what should happen when the condition is met.
- Select an Action
- Choose a Target Field
Adding a Condition
To create a condition:
- Click on + Add Condition under the CONDITIONS (IF) section
- Select:
– Field
– Operator
– Value
- In the ACTION (DO) section:
– Choose an action
– Select the target field
You can add multiple actions for a single condition.
Adding Multiple Conditions and Groups
You can create advanced conditional logic by combining multiple conditions and groups.
Multiple Conditions within the Same Group
- Click + Add Condition to add multiple conditions within a single group
- Each condition can be connected using AND or OR logic
AND Logic:
- All conditions must be true
OR Logic:
- Any one condition can be true
You can switch between AND / OR using the toggle button available between conditions.
Multiple Condition Groups
- Use the + (Plus Icon) at the top to create a new condition group
- Each group works independently
Available Operators
The following operators are available based on field type:
- = (Equals)
- != (Not Equals)
- > (Greater Than)
- < (Less Than)
- >= (Greater Than or Equal)
- <= (Less Than or Equal)
- Contains
- Is Empty
- Is Not Empty
Available Actions
You can configure the following actions:
- Show Field – Displays the field
- Hide Field – Hides the field
- Make Required – Marks the field as mandatory
- Make Optional – Removes required validation
- Enable Field – Enables the field for input
- Disable Field – Disables the field
Logic Conflict Detection
The system automatically detects conflicting rules to help prevent unexpected behaviour in form logic.
When a conflict is detected:
- A “Logic Conflict Detected” warning message is displayed
- The warning highlights that the same field is used in multiple conflicting conditions
- Users can review and adjust the logic if needed
5. Advanced Features
Import & Export Custom Forms
KiviCare allows you to migrate custom forms between environments.
- Export
- Download form configurations as JSON files.
- Import
- Upload JSON files to recreate forms in another system.
This feature is useful for:
- Migrating forms between staging and production
- Sharing standardized forms across clinics
- Backing up complex form configurations
5. Best Practices
- Use clear and descriptive field labels for better user understanding
- Limit required fields to avoid form fatigue
- Test forms using Preview before activating
- Export forms regularly as backups